DIY Humidifier: How to Make Your Own at Home
Wondering how to keep your home comfortably humid without spending a lot? You can craft a simple, effective humidifier for under $10 using household items.
Whether you prefer a sponge setup or a passive bowl, I’ll walk you through easy DIY options to boost moisture levels safely.
Keep reading to learn the best tricks to maximize your homemade humidifier’s performance.
Why a DIY Humidifier Beats Buying One
Building a DIY humidifier is significantly cheaper than buying one. You can often reuse household items like pots, bowls, or towels at near zero cost, whereas commercial units typically require a larger initial investment, often around $70 to $80 for a budget-friendly model. Furthermore, operating a DIY evaporative humidifier consumes about 15 watts, which costs roughly $1.62 per month based on average electricity rates. In contrast, simple natural methods such as placing bowls of water require no power at all and are completely free to run. However, for those seeking higher output, an industrial DIY design can use an ultrasonic atomizer to produce 7 liters of mist per hour, as seen in advanced builds. Many commercial space heaters for large rooms also cost around $70 to $80, showing that budget-friendly models are similarly priced to entry-level humidifiers. Maintenance is simpler with a DIY approach. Instead of dealing with complex water tanks and mineral buildup, you can clean or replace a towel or basin easily. Regular upkeep involves swapping out cloths or bowls as needed, avoiding the need for consumables like filters or wicks that commercial units depend on. With fewer components, you face less hassle and fewer things that can break down. For comparison, a bedroom dehumidifier often costs more to run and maintain than a simple DIY solution. For example, top-rated window air conditioners also emphasize simple upkeep to avoid mineral buildup and extend the unit’s lifespan.

Efficient Atomization: Uses 108KHz ultrasonic frequency to create ultra-fine 5μm mist with high efficiency and low power consumption.

Product name: four spray atomization driving board; Rated voltage: DC 5V; Atomization frequency: 108KHZ ± 2KHZ; Rated current: 300MA; Power: 2.5-3W

Type-C Interface Humidifier Module USB Spray Module Circuit Board Atomization Module 5V Atomization Plate Circuit Board Atomization Module Atomizer DIY Incubation Experimental Equipment
Choose Your Build: Passive, Fan-Assisted, or Ultrasonic
Choosing your build depends on your needs and safety preferences. A passive setup is the simplest—you just need a bottle, a cloth strip, and a sponge. It requires minimal safety measures since it operates without electricity, but you must change the water regularly to prevent microbial growth.
A fan-assisted design enhances evaporation speed using a low-voltage fan. Your material options expand to include a fan, a container, and a wick. Make sure to mount the fan above water level to prevent electrical hazards, and always verify the wiring is secure and insulated for safety. To prevent buildup in the wick, regular cleaning is essential, just as with a tower fan. For optimal indoor air quality, consider pairing this build with a smart thermostat premium to regulate humidity alongside temperature.
An ultrasonic model uses a piezo disc to create mist from water. This build involves electronic components such as transistors and resistors. Safety precautions include attaching a heatsink to the transistor to prevent overheating and using only plain water without additives. This avoids damaging the device or compromising mist quality. Unlike reed diffusers, these builds rely on active mechanical or electronic methods to disperse moisture rather than passive evaporation from wicks.
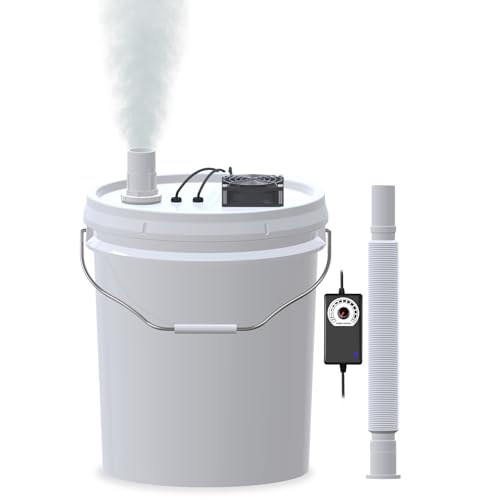
Large Capacity & Long Runtime: Transform any 5-gallon bucket into a powerful humidifier, Runs over 3 days (72 hours) at full power; extends to weekly refills when paired with a humidity controller. Ideal for grow tents, greenhouses, mushroom tents, terrariums, and houseplants
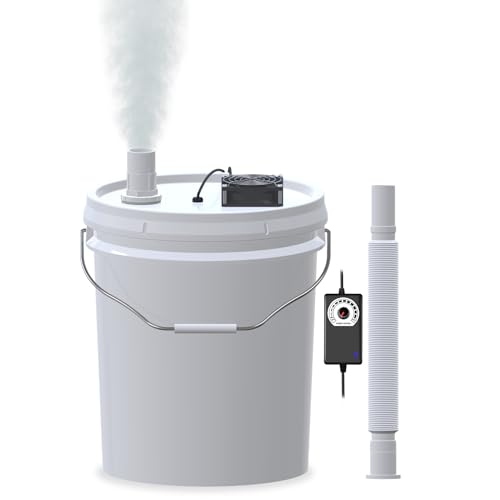
Large Capacity & Long Runtime: Transform any 5-gallon bucket into a powerful humidifier, Runs over 3 days (72 hours) at full power; extends to weekly refills when paired with a humidity controller. Ideal for grow tents, greenhouses, mushroom tents, terrariums, and houseplants

Versatile Application: This ultrasonic mist maker is a versatile 5V mini humidifier module, ideal for USB humidifiers, aroma diffusers, and DIY misting projects
Which Design Is Easiest for a Beginner?
The fan-assisted sponge wick design is the easiest upgrade for a beginner. Its construction remains simple because you only need to add a small fan facing a wet sponge, which is held in place by a skewer. The materials involved are household items—such as a container, sponge, skewer, and fan—which keep the project straightforward and accessible. For instance, many store-bought humidifiers use evaporative wick technology to regulate moisture for plants like peace lilies. This setup is less complicated than the cloth wick version, which tends to be less stable. If you are unsure which design suits your needs, reviewing a guide on the best humidifier for your baby can help clarify the trade-offs between simplicity and performance. Starting with the passive bowl is even simpler, making it the fastest route to see results without much effort. This design prioritizes low-cost and readily available supplies to achieve effective humidification. For quieter operation, some users prefer a setup inspired by dual hose air conditioners that separate intake and exhaust for greater airflow stability.
How to Build the Sponge Humidifier in 10 Minutes
To build the sponge humidifier in 10 minutes, you’ll need a shallow pan, a large sponge, a small fan, and water. Place the sponge in the pan so its lower half is submerged, allowing it to soak up water, while the top remains exposed to air. Fill the pan until the sponge’s base is just submerged but not dripping. Position the fan behind the setup, pointing toward the sponge, and set it to low speed. This airflow speeds up evaporation by forcing air across the wet surface. In close proximity, this device can achieve about a 15°F temperature reduction with humidity increase, generating a noticeable cooling effect. For a more powerful option, consider using a ceiling fan with lights to circulate air more effectively across the room. The science behind this setup relies on evaporative cooling, where the heat from the air is absorbed to turn water into vapor.
Keep in mind that a regular sponge provides only a temporary increase in humidity and cannot match the output of a dedicated humidifier. It dries out quickly, so you’ll need to re-wet it regularly. Always prioritize safety by keeping the fan and electrical cords away from any water to prevent shocks. While this DIY solution won’t precisely control humidity levels, it offers a quick and affordable fix for a dry room. For a more consistent mist output, you could explore other DIY cold mist designs that use a wicking material and a water reservoir.

3 in 1 Design: 350ml humidifier, small fan and LED night light, 3 in 1 design offers you a comfortable and cool mist experience in summer. Widely used in bedroom, desk,...
Boost Your DIY Humidifier’s Output: 4 Proven Tricks
To boost your humidifier’s output quickly, add gentle heat to speed evaporation. Placing your humidifier near a radiator or heater harnesses ambient warmth, or you can use hot water in a bowl to raise the local temperature. Warmth makes water molecules evaporate faster, increasing humidity levels more rapidly. Selecting a model designed for quiet operation, such as a top dehumidifier for a bedroom, can also help maintain comfort while controlling excess moisture. For homeowners concerned about pests, using a dehumidifier is also an effective strategy to discourage centipedes, which thrive in damp environments. Using a cool mist humidifier can also help ease infant congestion by adding moisture to dry air.
Maintain your system regularly to keep the output optimal. Clean the sponge or filter often to prevent mold buildup, use distilled water to avoid mineral scale, and regularly check for clogs or blockages. Using a hygrometer helps you monitor indoor humidity levels, keeping them between 30% and 50%. This range ensures effective humidification without overdoing it, which can lead to issues like mold or dust mites. For even greater output, you can stack two humidifiers so that water cascades from the top to the bottom, doubling effectiveness without extra water use.